A Step-by-Step Guide to Installing MySQL and MySQL Workbench on Windows

Introduction
MySQL is a widely used open-source relational database management system. MySQL Workbench is a graphical tool that allows you to easily interact with MySQL databases. This guide will walk you through the installation and configuration of MySQL and MySQL Workbench on a Windows machine.
Prerequisites
- A Windows computer (Windows 7 or newer)
- Administrative access to your computer
Step 1: Download MySQL Installer
- Open your web browser and navigate to the MySQL Downloads page.
- In the “MySQL Installer” section, select Microsoft Windows as the operating system and click on the “Download” button for the MySQL Installer MSI.

On the next page, you’ll be prompted to log in or create a MySQL account. Click on No thanks, start my download to proceed without logging in.

Step 2: Install and Configure MySQL
- Run the Installer:
- Locate the downloaded installer file (e.g., mysql-installer-web-community-x.x.xx.x.msi) and double-click it to start the installation process.

2. Choose Setup Type:
- In the installer window, select Full under “Setup Type.” This option will install MySQL Server, MySQL Workbench, and other components like documentation and examples.
- Click Next.

3. Execute Installation:
- Click on Execute in the following window to download and install all selected products.

Once the products are successfully downloaded (indicated by green checkmarks), click Next.

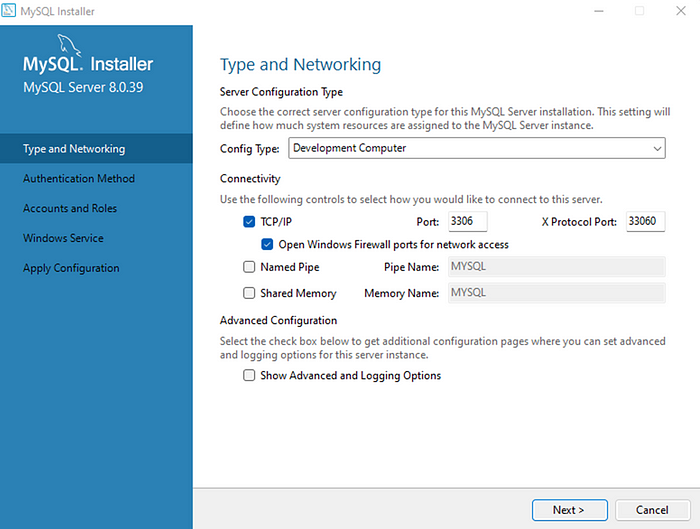
4. Configuration:
- Under “Type and Networking,” choose Development Computer as the configuration type and leave other settings as default. Click Next.
5. Authentication Method:
- Choose Use Legacy Authentication Method for better compatibility and click Next. Choosing to Use Strong Password Encryption is also fine.

6. Accounts and Roles:
- Set a password for the root account. Enter the same password under the MySQL Root Password and Repeat Password fields. Click Next.

7. Windows Service:
- Leave the settings as they are and click Next.

8. Apply Configuration:
- Grant full access to allow the installer to update server file permissions. Click Next.
- Click Execute to apply the configuration changes. Once completed, click Finish.

9. MySQL Router Configuration:
- This step configures MySQL Router and “Samples and Examples”. Enter the password you set earlier and click Check. If successful, a green checkmark will appear.
- Click Next, then Execute to apply the configurations. After completion, click Finish.
Under “Connect to Server” enter the password you chose earlier under Password and click “Check.”

If the password is correct, a green checkmark will appear, and the status of the connection will change to “Connection succeeded.”
- Click “Next.”

- Click “Execute” to apply the configurations.

- Once the configuration is completed (green checkmarks), click “Finish.”

That’s it! The installation is complete. You can now choose whether MySQL Workbench and Shell should be launched — we only need MySQL Workbench right now.
Step 3: Using MySQL Workbench
- Launch MySQL Workbench:
- If MySQL Workbench does not launch automatically after installation, start the program manually.

2. Connecting to Local Instance:
- Under the “MySQL Connections” section, double-click on the tile for your local instance, Local instance MySQL80.
- Enter the password you set earlier and click OK.

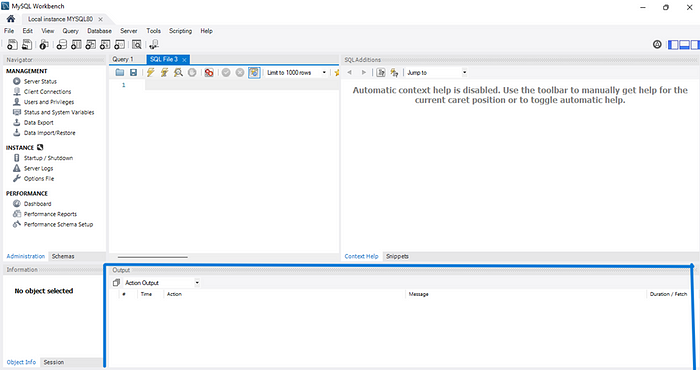
3. Navigating MySQL Workbench:
- Navigator: Located on the left side, it contains administrative features and a tree-like structure of your databases under the Schemas tab.

4. Query Tab: In the middle of the workspace, this is where you write and execute SQL queries.

5. Output Tab: Located at the bottom, it displays the execution results of your SQL queries, error messages, and status updates.
Step 4: Testing the Connection
- Open a New Query Tab:
- Click the + SQL icon in the top left corner or go to File > New Query Tab.

2. Test SQL Query:
- Enter the following SQL command to display the current date and time:

Another command Select version ();

3. Verify Results:
- If the query executes successfully and displays the current date and time in the result pane, your connection to the MySQL server is working. If not, verify your connection settings (hostname, port, username, and password) and ensure your MySQL server is running.
Conclusion
You have successfully installed and configured MySQL Server and MySQL Workbench on your Windows machine. You are now ready to import, create, and query your databases.